2022-10-05 22:06:10 +09:00
|
|
|
|
---
|
|
|
|
|
|
title: CHIRIMEN ハンズオン
|
|
|
|
|
|
marp: true
|
|
|
|
|
|
paginate: true
|
2022-10-06 14:46:52 +09:00
|
|
|
|
style: |
|
|
|
|
|
|
section :is(h1, h2, h3, h4, h5, h6) {
|
|
|
|
|
|
border-bottom: 10px solid #F5CE52;
|
|
|
|
|
|
}
|
2022-10-05 22:06:10 +09:00
|
|
|
|
---
|
|
|
|
|
|
|
2022-10-09 09:20:29 +09:00
|
|
|
|
# 1 日目
|
|
|
|
|
|
|
|
|
|
|
|
---
|
|
|
|
|
|
|
2022-10-06 14:52:40 +09:00
|
|
|
|

|
|
|
|
|
|
|
|
|
|
|
|
---
|
|
|
|
|
|
|
2022-10-05 22:06:10 +09:00
|
|
|
|
# CHIRIMEN ハンズオン
|
|
|
|
|
|
|
|
|
|
|
|
2022-10-08/2022-10-09 in 岡山
|
|
|
|
|
|
|
|
|
|
|
|
WebDINO Japan シニアエンジニア
|
|
|
|
|
|
[渡邉浩平](https://github.com/kou029w)
|
|
|
|
|
|

|
|
|
|
|
|
|
|
|
|
|
|
---
|
|
|
|
|
|
|
2022-10-07 21:33:22 +09:00
|
|
|
|
## CHIRIMEN とは
|
|
|
|
|
|
|
|
|
|
|
|

|
|
|
|
|
|
|
|
|
|
|
|
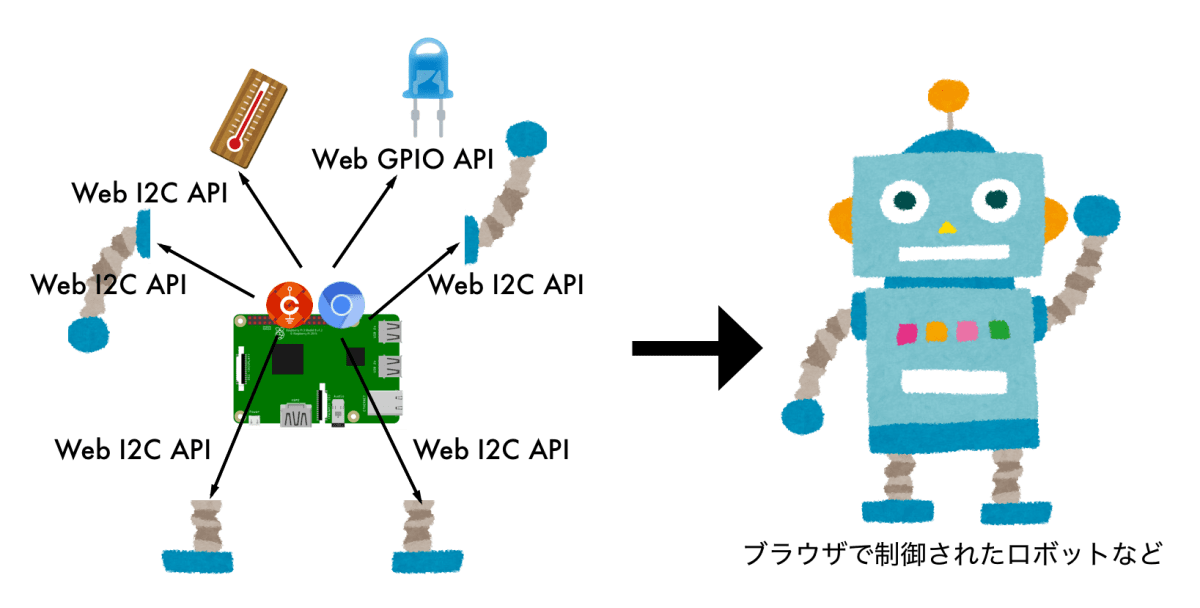
Web ブラウザーからハードウェアを制御するプロトタイピング環境
|
|
|
|
|
|
センサーやモーターなど組み合わせたさまざまなものをつくることができます
|
|
|
|
|
|
|
|
|
|
|
|
---
|
|
|
|
|
|
|
2022-10-07 21:37:06 +09:00
|
|
|
|
## 作品例
|
|
|
|
|
|
|
2022-10-09 09:20:29 +09:00
|
|
|
|

|
2022-10-07 21:37:06 +09:00
|
|
|
|
|
|
|
|
|
|
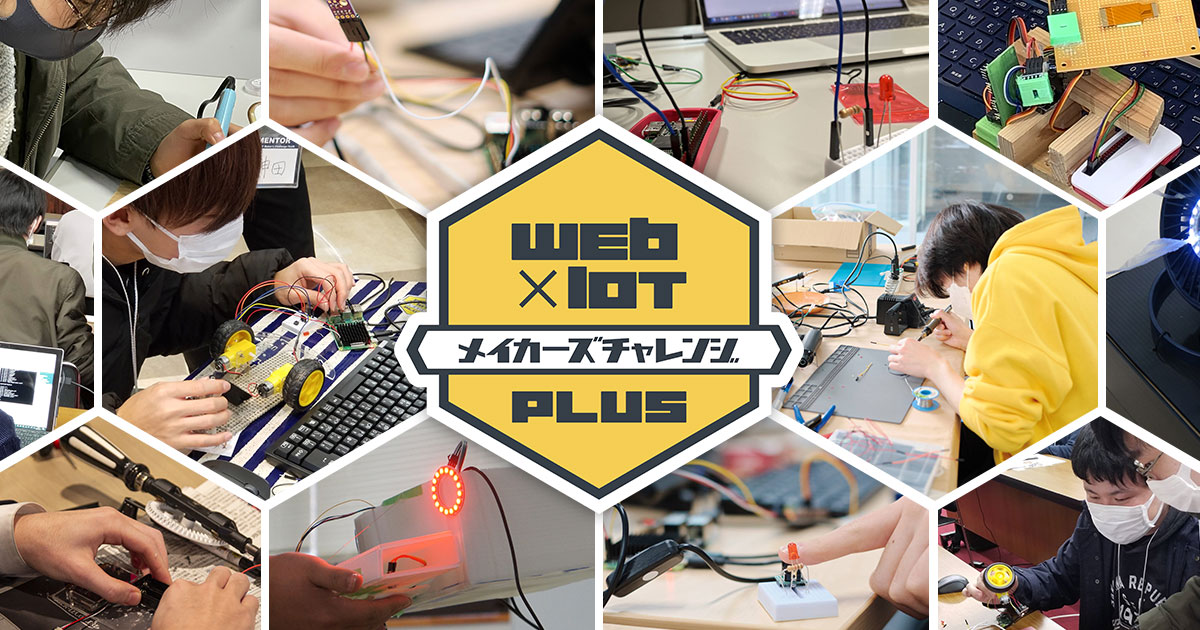
<!-- _footer: 画像の引用元: Web×IoT メイカーズチャレンジ 作品ギャラリー https://webiotmakers.github.io/gallery/ -->
|
|
|
|
|
|
|
|
|
|
|
|
---
|
|
|
|
|
|
|
2022-10-05 22:06:10 +09:00
|
|
|
|
## 本日の流れ
|
|
|
|
|
|
|
2022-10-06 17:50:02 +09:00
|
|
|
|
準備編 (11:20-12:00)
|
2022-10-05 22:06:10 +09:00
|
|
|
|
|
|
|
|
|
|
- セットアップ
|
|
|
|
|
|
|
|
|
|
|
|
基礎編 (13:00-17:00)
|
|
|
|
|
|
|
2022-10-07 21:30:07 +09:00
|
|
|
|
- L チカしてみよう
|
2022-10-05 22:06:10 +09:00
|
|
|
|
- GitHub アカウントの登録
|
|
|
|
|
|
- GPIO に関する基礎知識
|
|
|
|
|
|
- I2C に関する基礎知識
|
|
|
|
|
|
|
2022-10-07 21:30:07 +09:00
|
|
|
|
---
|
|
|
|
|
|
|
|
|
|
|
|
## 本日のゴール
|
|
|
|
|
|
|
|
|
|
|
|
基礎編
|
2022-10-05 22:06:10 +09:00
|
|
|
|
|
2022-10-07 21:30:07 +09:00
|
|
|
|
- センサーやモーターの基本的な使い方を理解する
|
2022-10-05 22:06:10 +09:00
|
|
|
|
|
|
|
|
|
|
---
|
|
|
|
|
|
|
|
|
|
|
|
## Slack にアクセス (まだの方)
|
|
|
|
|
|
|
|
|
|
|
|
[webiotmakerschallenge.slack.com](https://webiotmakerschallenge.slack.com)
|
|
|
|
|
|
|
|
|
|
|
|
---
|
|
|
|
|
|
|
|
|
|
|
|
## ハンズオン資料
|
|
|
|
|
|
|
|
|
|
|
|
[tutorial.chirimen.org/raspi](https://tutorial.chirimen.org/raspi/)
|
|
|
|
|
|
または
|
2022-10-07 21:30:07 +09:00
|
|
|
|
「chirimen チュートリアル」で検索
|
2022-10-05 22:06:10 +09:00
|
|
|
|
|
|
|
|
|
|
---
|
|
|
|
|
|
|
2022-10-07 22:28:12 +09:00
|
|
|
|
## 困ったとき・分からないとき・気になることがあるとき
|
2022-10-07 21:37:43 +09:00
|
|
|
|
|
2022-10-07 22:28:12 +09:00
|
|
|
|
会場のスタッフにお気軽にお声がけください 🖐
|
|
|
|
|
|
(Slack でも OK 👌)
|
2022-10-07 21:37:43 +09:00
|
|
|
|
|
|
|
|
|
|
---
|
|
|
|
|
|
|
2022-10-07 22:20:23 +09:00
|
|
|
|
## 機材の確認
|
2022-10-06 17:46:23 +09:00
|
|
|
|
|
2022-10-07 22:20:23 +09:00
|
|
|
|
必要なもの
|
|
|
|
|
|
|
|
|
|
|
|
- クリアボックス
|
|
|
|
|
|
- ディスプレイ/HDMI ケーブル/変換アダプター/AC アダプター (Type-C)
|
|
|
|
|
|
- AC アダプター付き電源タップ/Type-C ケーブル
|
|
|
|
|
|
- Raspberry Pi 本体/ヒートシンク
|
|
|
|
|
|
- 有線マウス
|
|
|
|
|
|
- キーボード
|
|
|
|
|
|
- CHIRIMEN スターターキット
|
|
|
|
|
|
- microSD カード
|
|
|
|
|
|
|
|
|
|
|
|
(必要なもの以外はクリアボックスに片付けておきましょう)
|
2022-10-06 17:46:23 +09:00
|
|
|
|
|
|
|
|
|
|
<!-- _footer: https://tutorial.chirimen.org/raspi/section0#section-1 -->
|
|
|
|
|
|
|
|
|
|
|
|
---
|
|
|
|
|
|
|
2022-10-07 22:20:23 +09:00
|
|
|
|
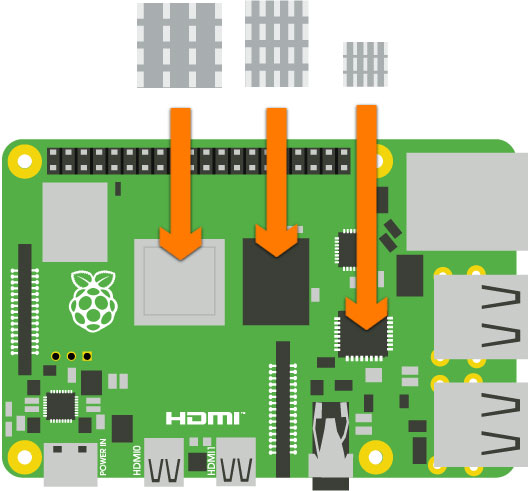
## ヒートシンクの取り付け
|
|
|
|
|
|
|
|
|
|
|
|
> 
|
|
|
|
|
|
|
|
|
|
|
|
<!-- _footer: 画像の引用元: Get started with your OKdo Pi Kit in a flash - OKdo https://www.okdo.com/getstarted/ -->
|
|
|
|
|
|
|
|
|
|
|
|
---
|
|
|
|
|
|
|
2022-10-06 17:46:23 +09:00
|
|
|
|
## Raspberry Pi の起動
|
|
|
|
|
|
|
|
|
|
|
|

|
|
|
|
|
|
|
|
|
|
|
|
<!-- _footer: https://tutorial.chirimen.org/raspi/section0#chirimen-for-raspberry-pi--1 -->
|
|
|
|
|
|
|
|
|
|
|
|
---
|
|
|
|
|
|
|
|
|
|
|
|
## Wi-Fi の設定
|
|
|
|
|
|
|
|
|
|
|
|
Raspberry Pi の起動後、画面右上のパネルをクリックして設定を行います
|
|
|
|
|
|
|
|
|
|
|
|

|
|
|
|
|
|
|
|
|
|
|
|
(接続情報は会場で確認しましょう)
|
|
|
|
|
|
|
|
|
|
|
|
<!-- _footer: https://tutorial.chirimen.org/raspi/section0#wifi- -->
|
|
|
|
|
|
|
|
|
|
|
|
---
|
|
|
|
|
|
|
|
|
|
|
|
## ブレッドボードでの配線
|
|
|
|
|
|
|
|
|
|
|
|

|
|
|
|
|
|
|
|
|
|
|
|
<!-- _footer: https://tutorial.chirimen.org/raspi/section0#section-7 -->
|
|
|
|
|
|
|
|
|
|
|
|
---
|
|
|
|
|
|
|
|
|
|
|
|
## サンプルコードの実行
|
|
|
|
|
|
|
|
|
|
|
|
ブラウザー > Examples > GPIO Examples > GPIO-Blink > CSB (CodeSandbox)
|
|
|
|
|
|
|
|
|
|
|
|

|
|
|
|
|
|
|
|
|
|
|
|
<!-- _footer: CHIRIMEN Examples https://chirimen.org/chirimen/gc/top/examples/ -->
|
|
|
|
|
|
|
|
|
|
|
|
---
|
|
|
|
|
|
|
|
|
|
|
|
## ここまでのまとめ
|
|
|
|
|
|
|
|
|
|
|
|
- CHIRIMEN for Raspberry Pi の起動
|
|
|
|
|
|
- LED を制御するサンプルコード (通称 LED チカチカ、L チカ) の実行
|
|
|
|
|
|
|
|
|
|
|
|
---
|
|
|
|
|
|
|
2022-10-06 19:01:06 +09:00
|
|
|
|
## GitHub アカウントの登録
|
|
|
|
|
|
|
|
|
|
|
|
---
|
|
|
|
|
|
|
|
|
|
|
|
## GitHub アカウントの登録
|
2022-10-06 18:45:24 +09:00
|
|
|
|
|
2022-10-06 18:46:06 +09:00
|
|
|
|
[GitHub > Sign up](https://github.com/signup) からアカウントを作成します
|
|
|
|
|
|
アカウントに必要な項目を入力します
|
2022-10-06 18:45:24 +09:00
|
|
|
|
|
|
|
|
|
|

|
|
|
|
|
|
|
|
|
|
|
|
---
|
|
|
|
|
|
|
2022-10-06 19:01:06 +09:00
|
|
|
|
## GitHub アカウントの登録
|
2022-10-06 18:45:24 +09:00
|
|
|
|
|
|
|
|
|
|

|
|
|
|
|
|
|
|
|
|
|
|
<!-- _footer: Join GitHub https://github.com/signup -->
|
|
|
|
|
|
|
|
|
|
|
|
---
|
|
|
|
|
|
|
2022-10-06 19:01:06 +09:00
|
|
|
|
## GitHub アカウントの登録
|
2022-10-06 18:45:24 +09:00
|
|
|
|
|
2022-10-06 18:46:06 +09:00
|
|
|
|
入力したメールアドレスに登録用のメールが届くので確認します
|
2022-10-06 18:45:24 +09:00
|
|
|
|
|
|
|
|
|
|

|
|
|
|
|
|
|
|
|
|
|
|
<!-- _footer: Join GitHub https://github.com/signup -->
|
|
|
|
|
|
|
|
|
|
|
|
---
|
|
|
|
|
|
|
2022-10-06 19:01:06 +09:00
|
|
|
|
## GitHub アカウントの登録
|
2022-10-06 18:45:24 +09:00
|
|
|
|
|
2022-10-06 19:01:06 +09:00
|
|
|
|
次のような画面になれば OK
|
2022-10-06 18:45:24 +09:00
|
|
|
|
|
|
|
|
|
|

|
|
|
|
|
|
|
|
|
|
|
|
<!-- _footer: GitHub https://github.com/ -->
|
|
|
|
|
|
|
|
|
|
|
|
---
|
|
|
|
|
|
|
2022-10-05 22:06:10 +09:00
|
|
|
|
## CodeSandbox の使い方
|
|
|
|
|
|
|
2022-10-06 17:46:23 +09:00
|
|
|
|
- [CodeSandbox の基本的な使い方](https://csb-jp.github.io/docs/usage)
|
2022-10-05 22:06:10 +09:00
|
|
|
|
|
|
|
|
|
|
---
|
|
|
|
|
|
|
2022-10-09 09:20:29 +09:00
|
|
|
|
## 後付
|
|
|
|
|
|
|
|
|
|
|
|
---
|
|
|
|
|
|
|
2022-10-05 22:06:10 +09:00
|
|
|
|
## その他
|
|
|
|
|
|
|
|
|
|
|
|
- [デバッグ・トラブルシューティング](https://tutorial.chirimen.org/raspi/debug)
|
|
|
|
|
|
- [Tips・テクニック](https://tutorial.chirimen.org/raspi/tips)
|
|
|
|
|
|
- [良くある質問と回答](https://tutorial.chirimen.org/raspi/faq)
|
2022-10-09 09:20:29 +09:00
|
|
|
|
|
|
|
|
|
|
---
|
|
|
|
|
|
|
|
|
|
|
|
# 2 日目
|
|
|
|
|
|
|
|
|
|
|
|
---
|
|
|
|
|
|
|
|
|
|
|
|
## いろいろなデバイスを触ってみよう
|
|
|
|
|
|
|
|
|
|
|
|
自分の席に着き次第、自由に進めてもらって OK 👌
|
|
|
|
|
|
|
|
|
|
|
|
---
|
|
|
|
|
|
|
|
|
|
|
|
## 本日の流れ
|
|
|
|
|
|
|
|
|
|
|
|
ハンズオン講習会
|
|
|
|
|
|
|
|
|
|
|
|
- 10:00-10:10 はじめに
|
|
|
|
|
|
- 11:30-12:00 片付け
|
|
|
|
|
|
|
|
|
|
|
|
アイディアワークショップ
|
|
|
|
|
|
|
|
|
|
|
|
- 13:00-13:30 インプットトーク
|
|
|
|
|
|
- 13:30-16:00 各チームの作戦会議
|
|
|
|
|
|
- 16:00-16:20 各チームの進捗共有
|
|
|
|
|
|
- 16:30-17:00 ハッカソンの説明など
|
|
|
|
|
|
|
|
|
|
|
|
---
|
|
|
|
|
|
|
|
|
|
|
|
## ハッカソンのポイント
|
|
|
|
|
|
|
|
|
|
|
|
- ときめくような素敵なアイディア
|
|
|
|
|
|
- 審査本番に作品が機能すること
|
|
|
|
|
|
|
|
|
|
|
|
<!-- NOTE: 昨日・今日と技術的な話を中心にやってきましたが、極端な話ハッカソンの本番は、技術的に優れているかどうかは一旦忘れてもらってOK、コピペでOK、人の真似でOK
|
|
|
|
|
|
ですが限られた時間しかないので、これからの時間で、やりたいことを周りのスタッフに相談したり、Slackで相談してみてください
|
|
|
|
|
|
-->
|
|
|
|
|
|
|
|
|
|
|
|

|
|
|
|
|
|
|
|
|
|
|
|
<!-- _footer: 画像の引用元: Web×IoT メイカーズチャレンジ 作品ギャラリー https://webiotmakers.github.io/gallery/ -->
|
|
|
|
|
|
|
|
|
|
|
|
---
|
|
|
|
|
|
|
2022-10-09 10:56:37 +09:00
|
|
|
|
## 応用編
|
|
|
|
|
|
|
|
|
|
|
|
- I2C で複数のデバイス扱う
|
|
|
|
|
|
- 遠隔制御
|
|
|
|
|
|
|
|
|
|
|
|
---
|
|
|
|
|
|
|
|
|
|
|
|
## I2C で複数のデバイス扱う
|
|
|
|
|
|
|
|
|
|
|
|
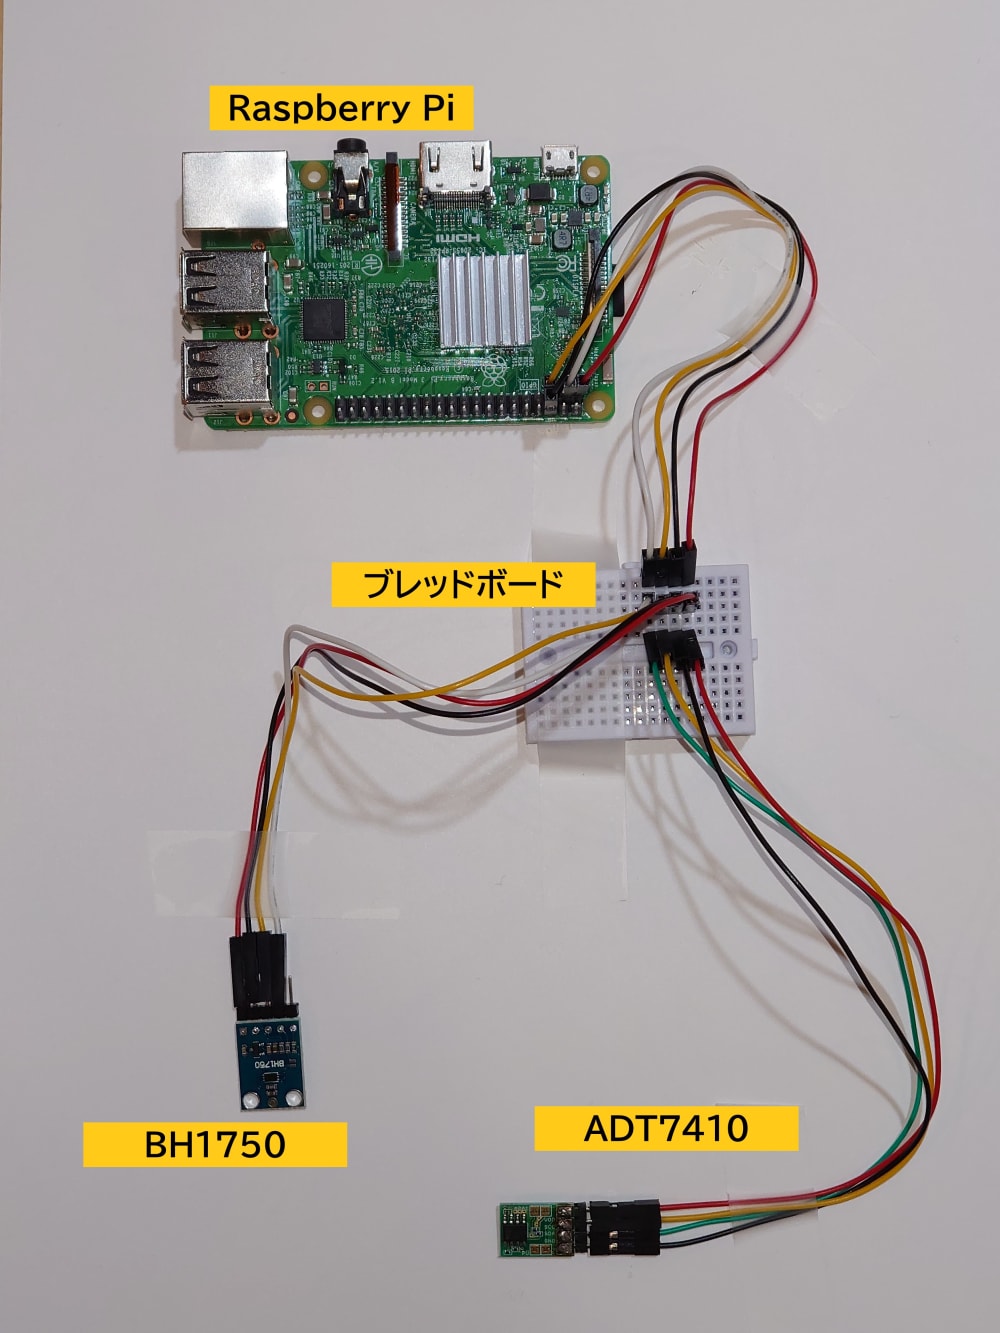
それぞれのモジュールの VCC/GND/SDA/SCL を並列接続
|
|
|
|
|
|

|
|
|
|
|
|
スレーブアドレスが同じデバイスは同時に接続できません
|
|
|
|
|
|
https://tutorial.chirimen.org/raspi/section3#section-7
|
|
|
|
|
|
|
|
|
|
|
|
---
|
|
|
|
|
|
|
|
|
|
|
|
## I2C で複数のデバイス扱う - 温湿度センサーと距離センサーの例
|
|
|
|
|
|
|
|
|
|
|
|
<iframe src="https://codesandbox.io/embed/sht30-vl53l0x-pz620y?autoresize=1&codemirror=1&fontsize=14&hidenavigation=1&theme=dark"
|
|
|
|
|
|
style="width:100%; height:500px; border:0; border-radius: 4px; overflow:hidden;"
|
|
|
|
|
|
title="sht30-vl53l0x"
|
|
|
|
|
|
allow="accelerometer; ambient-light-sensor; camera; encrypted-media; geolocation; gyroscope; hid; microphone; midi; payment; usb; vr; xr-spatial-tracking"
|
|
|
|
|
|
sandbox="allow-forms allow-modals allow-popups allow-presentation allow-same-origin allow-scripts"
|
|
|
|
|
|
></iframe>
|
|
|
|
|
|
|
|
|
|
|
|
---
|
|
|
|
|
|
|
|
|
|
|
|
## 遠隔制御
|
|
|
|
|
|
|
|
|
|
|
|
ブラウザー > Examples > Remote Examples > REMOTE-I2C-SHT30 > CSB
|
|
|
|
|
|
|
2022-10-09 13:16:26 +09:00
|
|
|
|
[](https://codesandbox.io/s/github/chirimen-oh/chirimen/tree/master/gc/contrib/examples/remote-i2c-SHT30)
|
2022-10-09 10:56:37 +09:00
|
|
|
|
|
|
|
|
|
|
- `relay.subscribe("{ここは書き換えて使用してください}")`
|
|
|
|
|
|
|
|
|
|
|
|
---
|
|
|
|
|
|
|
2022-10-09 09:20:29 +09:00
|
|
|
|
## ⚠ 片付け注意事項
|
|
|
|
|
|
|
|
|
|
|
|
1. 借りたセンサーをすべて返却します
|
|
|
|
|
|
1. Raspberry Pi の電源を切ります
|
|
|
|
|
|
1. microSD カードは必ず抜き取り、CHIRIMEN スターターキットを片付けます
|
|
|
|
|
|
1. クリアボックスを片付けます
|
|
|
|
|
|
- できるだけ元の状態に戻してください
|
|
|
|
|
|
|
|
|
|
|
|
(詳しくは会場のスタッフが案内します)
|
|
|
|
|
|
|
|
|
|
|
|
---
|
|
|
|
|
|
|
|
|
|
|
|
## ハッカソンに向けて
|
|
|
|
|
|
|
|
|
|
|
|
リードタイムに注意 特に海外からの発送は時間がかかるので余裕を持って
|
|
|
|
|
|
品薄なものもあるので早めに調達を
|
|
|
|
|
|
https://gist.github.com/elie-j/8a27e7a65a40371e0cda5754ce0a063d
|